Hello, everyone.
This is Enta.
This is a continuation of the previous post.
Why Do Slopes Under Construction Collapse? (Part 1)
Relieving Pressure Before Collapse: A Discussion on Draining Injected Water (Part 2)
In Parts 1 and 2, I discussed the reasons why slopes under construction collapse and the use of driven drainage pipes as a countermeasure.
This time,Real-Life Examples of Sites Saved by DrainageAnd,Guidelines for the pore size, number of pores, and angle we useI think I'll try writing it lol
Case Study 1: Rain fell while installing the legal framework using the reverse-coil method. Water then gradually seeped in.
A site with a cut height of approximately 15 meters, a slope ratio of 1:0.8, and overall geology consisting of weathered granite. The rock is already heavily weathered (masa-ized).
After installing the formwork up to the third tier using the reverse-wrap method, it rained for three consecutive days, and brown water is slowly seeping out from the base of the completed tiers.
The formwork had already been installed, and since the rebar insertion crew was working at the intersection, we took the opportunity to drill drainage holes as needed while working our way down.
To put it simply, we’ll drive in about three or four piles at intervals of about 2 to 3 meters horizontally, focusing on the areas where water is seeping out.
It should take about 10 minutes to install each one.
Since we pour concrete at a height that allows the rebar inserters to work, we’ll start pouring around the second course.
It is 4.0 meters long.
On the other hand, if I keep hitting it, I'll just be wasting time, lol.
However, in the end, the government agency and the general contractor kept a close eye on this dewatering drilling work due to a design change, which really saved the day—otherwise, it might have collapsed?
When I think about it, I'm glad I did it on my own.
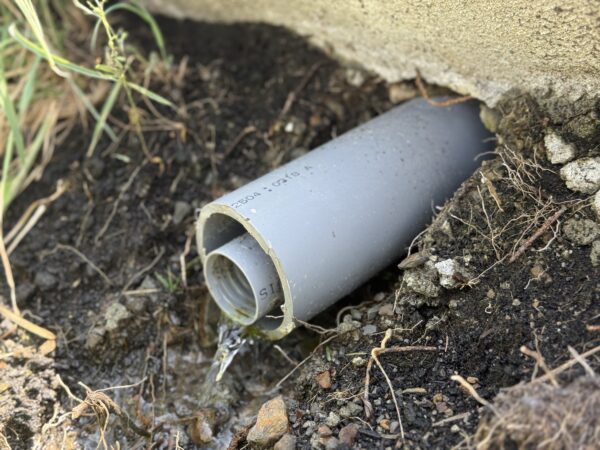
Case Study 2: Water Drainage Work at a Site Dedicated to Sprayed Mortar Construction
Although the project was designed for sprayed mortar, we found water marks and signs of subsidence at the top of the slope and on the surface, so we took the initiative to install drainage pipes.
Since the slope was gentle and the area consisted of soil, the concrete placement was relatively easy.
After the mortar was sprayed on, water kept leaking from here.
We identified the areas that looked problematic and poured four columns spaced 2 meters apart.
This spot was super soft, so I used some leftover SUS drain plugs from the office to provide some support!
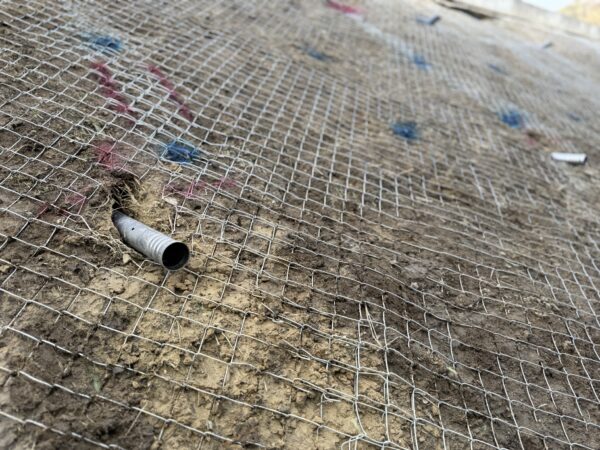
Case Study 3: A Site Where the Structure Collapsed Because Drainage Was Not Installed
The design involves sprayed mortar work plus rebar insertion (Site Conditions I)
That was the case, but when it rained, the water flow was actually pretty intense.
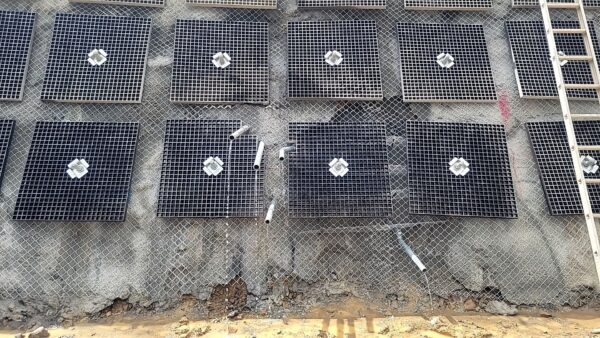
So, we laid the suspended drilling rig on its side and drilled a 4.0-meter drainage hole on our own initiative.
As you can see from the photo, there was an insane amount of water after that, lol.
This part was a huge success, but after the final inspection, the section where we hadn't installed drainage collapsed...
Looking back now, I wish I’d included it, but it’s just not realistic to keep adding things left and right as a volunteer...
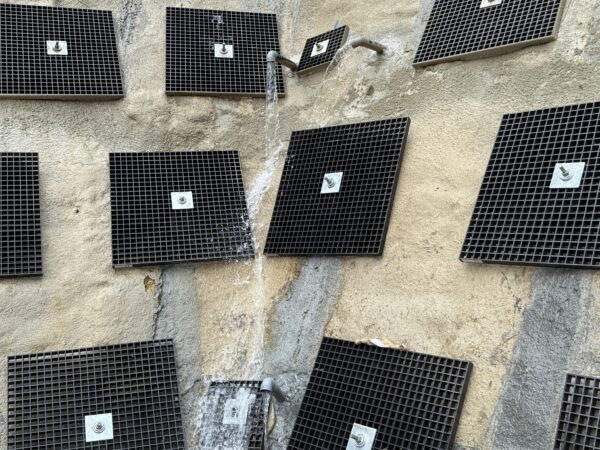
My Guidelines: Hole Diameter, Number of Holes, Angle
I’m often asked, “So how exactly do you do it at Entas?” So, strictly speaking,Our Internal GuidelinesI'll write it as follows.
Please note that these figures are based on rules of thumb derived from 30 years of experience, not on official guidelines.
[Pore Size]
The standard is a Φ40mm perforated tube. The hole diameter is Φ65mm.
If you make it too big, it just makes it harder to install—the effectiveness doesn't change. Φ40 is plenty.
However, when VP50 is available at a sprayed mortar job site, we sometimes drill a hole in it and insert the VP50.
[Length]
The standard range is L = 2.0 m to 4.0 m.
The goal is to cover a range of 0.5 to 2.0 meters in depth for surface collapse; ideally, we’d like to reach 4.0 meters.
If all you need to do is drill a hole of this size, it would take about 5 to 10 minutes even with a suspended drilling rig.
[Number and Placement]
The horizontal spacing is 2.0 to 3.0 meters per row.
If there are multiple steps, choose a spot that's easy to hit from.
Place them around the areas where you can see the wet streaks from the spring water.
Since the water isn't coming out evenly,It is more effective to spread it out horizontally, focusing on the area where water is leaking.。
[Angle]
0 to 3 degrees upward from the horizontal.
Even without a slope, water will flow to areas where there is no pressure.
In the worst-case scenario, even if the water level is lower, water will still flow out if the water level is higher than the drain opening.
Precautions for Draining Water After Pouring
Since it's not a one-size-fits-all solution, I'll also note some points to keep in mind.
(1) Contamination with cement slurry
As I mentioned in Part 2, once the rebar installation and anchor grouting are complete前If you insert a drain plug, milk may enter through the openings in the perforated tube and cause a clog.
The construction sequence for each section is as follows: “Reinforcement insertion/anchor grouting → followed shortly thereafter by → dewatering and concrete placement.”
② This is strictly a provisional measure.
Since this is just a temporary measure, it doesn't have to be perfect.
The effects will be permanent, but don't worry too much about it—just pour the concrete roughly without being too precise. (We don't get paid for this, lol.)
③ Identifying the Point of Water Discharge
Water tends to pool in damp areas and in valleys.
It would be great if we could find as many places like that as possible.
It would be fine if it seems okay, but I think it’s also important to assess the situation carefully when it rains.
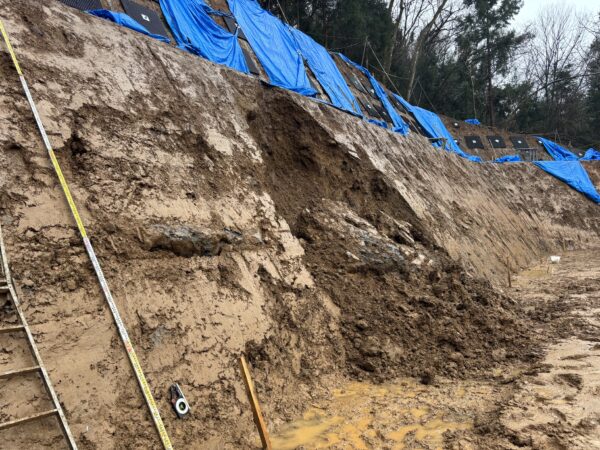
In the end, only those who can take action on the ground can protect others.
Most collapses that occur during construction areBe able to notice it in advanceThere are actually quite a few incidents.
Traces of spring water, the behavior of borehole water, and wet streaks after rain. The signs are there.
However, whether you decide to skip it because “it wasn’t included in the design” or go ahead and install one anyway based on the principle of “protecting your own site,” the outcome will be quite different.
We do this on our own initiative as a way to be creative.
It definitely doesn't make any money, lol.
But there are no accidents where workers get crushed, and the formwork doesn’t fall during construction, so we’re able to meet the construction schedule.
Personally, I think whether you view this as a “cost” or an “investment” is what sets companies apart.
If you suspect something is off at a site, please try driving in at least one stake.
If water comes out, it's a "win"; if it doesn't, it's "insurance."
There are definitely situations where this will make a difference.
See you later.