Hello, everyone.
This is Enta.
This is the continuation of the construction manual for trainees and foreign workers.
For now, I'm writing it like this, but would it be better to print it neatly on A4 paper?
I’m thinking about how to make this more convenient, but since I can’t spend that much time on it right now, I’ll just leave it as is for now...
I wish someone would do this lol
Construction Methods for Technical Intern Trainees (Part 1): Slope Cleaning Work
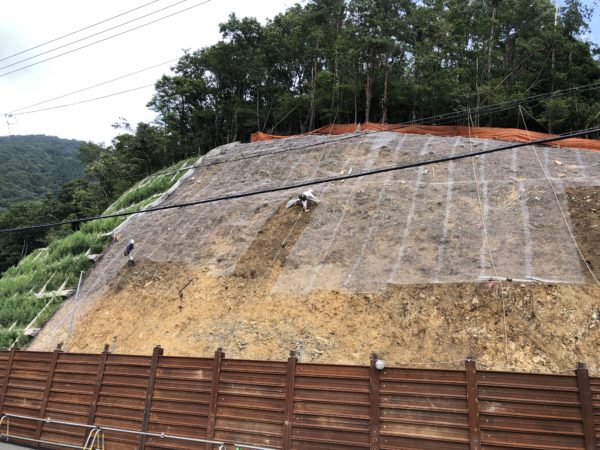
This time, it's the roof decking work.
I think there are some Japanese people who don’t fully understand this either, so I hope this has helped you update your understanding along with my own.
Shingle Installer
We will install galvanized diamond-shaped wire mesh on the slope.
The purpose of installing wire mesh (rasu-ami) is to improve the bond between the wall and the sprayed mortar.
When installing rebar for sprayed concrete formwork, tie wire is used to secure it to the wire mesh.
It is also being installed to play a vital role in maintaining the continuity of the entire mountain.
The inclusion of wire mesh (rasu-ami) can also help compensate for the weaknesses of concrete and mortar.
Properties of Concrete = High Compressive Strength
Properties of Reinforcing Bars = High Tensile Strength
1. How to Stretch a Lath
When setting up a net, you can either work from the top down or pull it up from the bottom.
When moving from top to bottom
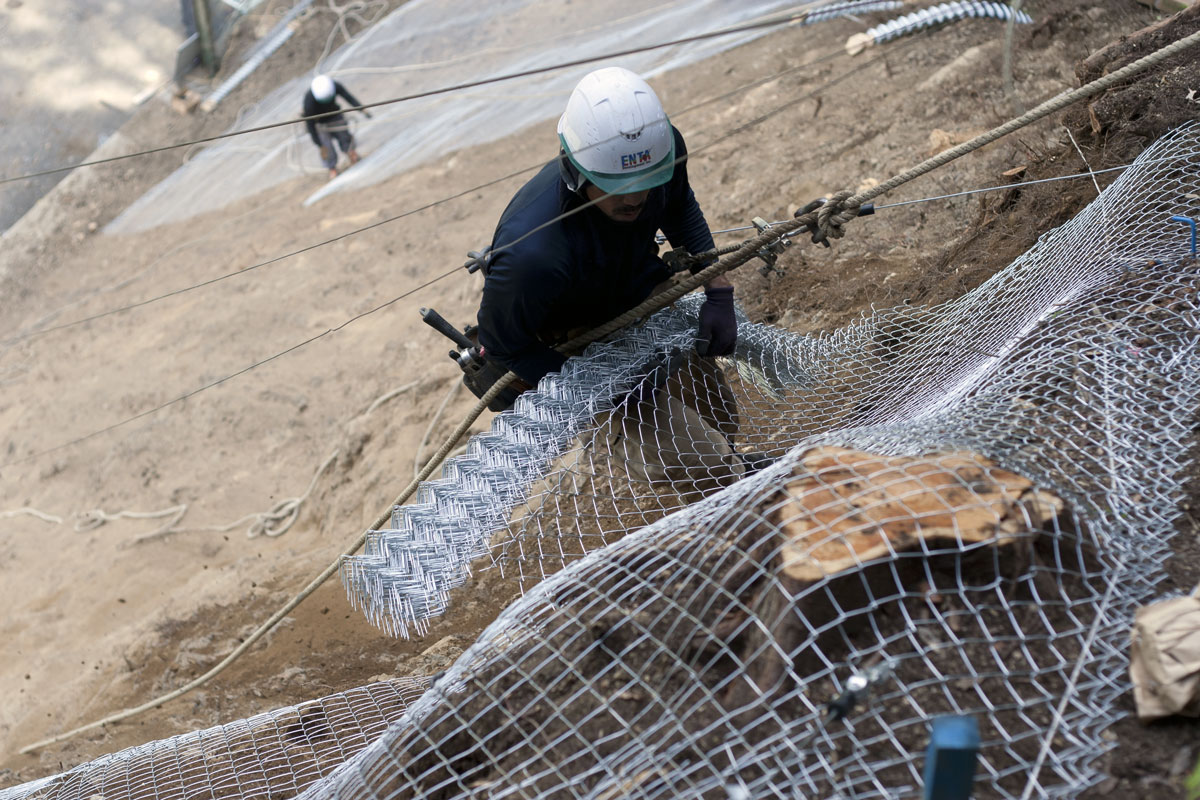
Transport the wire mesh to the top of the slope.
Holding the mesh net, I secure one end with an anchor pin and gradually lower myself down.
If there are many uneven spots, lower the mesh while keeping it loose.
When pulling from the bottom up, attach a rope to the end of the lath and pull it up from above.
Anyone lifting others must use a safety harness (fall arrest device) to prevent falls.
Please be careful of falling rocks while setting up the wire mesh from below.
2. Overlapping the mesh
This is a very important part of the last-layer application.
According to construction management standards, the overlap of wire mesh must be at least 100 mm.
No matter what happens, be sure to maintain an overlap of at least 100 mm.
If this cannot be ensured, it may be deemed a construction defect and require rework.
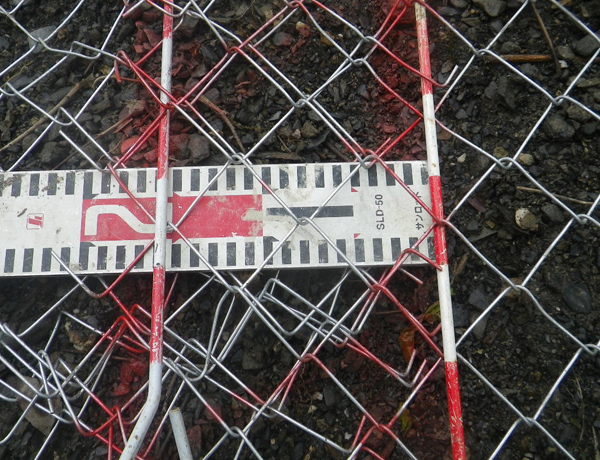
3. Installation of Anchor Pins
We will install anchors to secure the wire mesh.
Install the main anchor pins and auxiliary anchor pins.
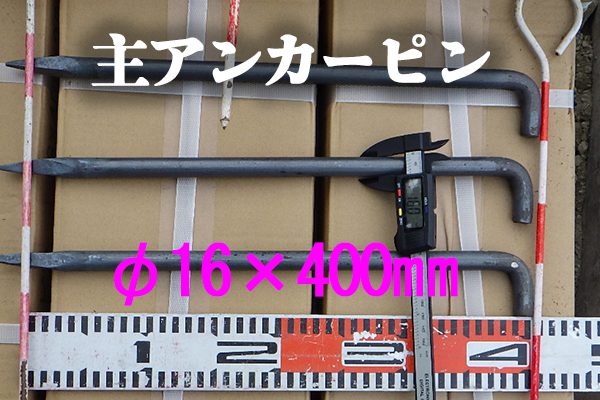
This is the main anchor pin.
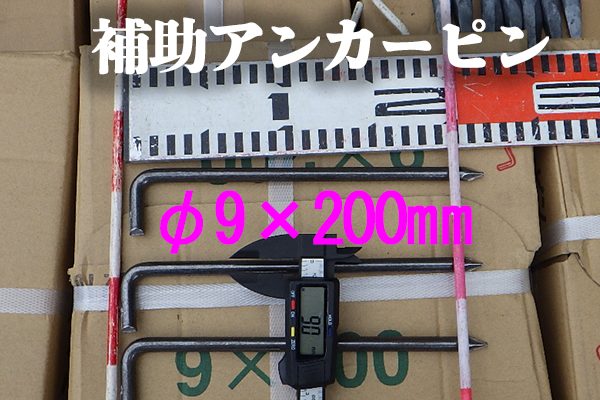
This is the auxiliary anchor pin.
Here is an example of the pouring process:
The main anchor pins will be installed at 2.0-meter intervals in both the longitudinal and transverse directions.
The spacing for driving auxiliary anchor pins is 0.75 cm to 1.0 m (overlap area of the wire mesh, center of the wire mesh, overlap area of the wire mesh).
If the rock is hard, use a hammer drill or rock drill to drive the pile.
When doing so, be sure to drill a hole that is the correct length for the anchor.
For the main anchor pin, 400 mm or more
For auxiliary anchor pins, 200 mm or more
It’s easier to understand this part if you hear the explanation on-site.
4. Verification of Anchor Installation
After the formwork is installed, there is an inspection called “Verification of Anchor Quantity.”
Per 100 m²
Main anchor pins: 30
Auxiliary anchor pins: 150
On-site, measurements are taken based on an area of 10 m² per unit, with at least 3 and at least 15 samples, respectively.
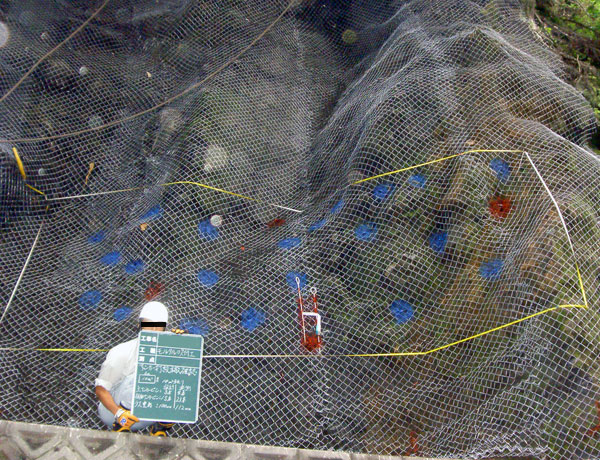
Be sure to pour the concrete so that the required number of bars is present.
In cases where the terrain is very rugged, it may be necessary to install a large number of anchors; however, it is not a problem if the number exceeds the design specification.
5. Equipment for Slope Workers
The basic equipment for a slope maintenance worker is
1. Safety harness (fall arrest device)
2. Rock Hammer
3. Hackers (for tying rebar)
4. Wire Cutter
5. Cutter
6. Pens (red and blue)
Construction methods may vary slightly depending on the contractor, but
Please understand that this is the nature of the work performed by a roof decking installer.
See you later.
Steel Mesh Installation (Steel Mesh Installer) Vietnamese
Install galvanized diamond-shaped steel mesh (Lattice Wire Mesh) on the slope roof.
The purpose of stretching the mesh is to help the mortar adhere firmly to the mountain surface.
When constructing a shotcrete frame, the steel bars are tied to the mesh with steel ties.
Steel mesh also plays an important role in holding the mountain's surface together.
Installing the mesh helps reinforce the weak points between the concrete and the mortar.
Properties of concrete: high compressive strength
Steel properties: high tensile strength
1. How to Stretch a Net
There are two ways to stretch the net: from the top down or by pulling it up from the bottom.
From top to bottom:
Hoist the net to the top of the roof, secure the top with an anchor pin, and then gradually unroll it.
If the surface is uneven, loosen the mesh so that it fits snugly.
From bottom to top:
Tie the rope to the top of the net, then pull it up from above.
The person pulling must wear a safety harness to prevent falls.
People below should watch out for falling rocks when tensioning the net.
2. Mesh Overlay
An important part of the construction process.
According to technical standards, the mesh must overlap by at least 100 mm.
If this is not ensured, it will be considered improper construction and will have to be redone.
3. Secure the anchor
Use anchor bolts to secure the mesh.
There are two types of latches: main latches and secondary latches.
This is the main anchor point.
This is a secondary anchor point.
Example:
– Main posts: 2.0 m apart (horizontally and vertically)
– Secondary fasteners: 0.75 m to 1.0 m apart (at the joints, in the middle of the mesh panel)
If the ground is hard, use a hammer drill or a rock drill to drive in the anchor.
Drilling depth:
– Main bolt: ≥ 400 mm
– Secondary bolt: ≥ 200 mm
4. Check the number of anchor bolts
After finishing the netting installation, check the number of anchor stakes.
Per 100 m²:
– Main pins: 30
– Auxiliary pins: 150 pieces
At the site, inspect every 10 m²:
– Main bolts: ≥ 3
– Auxiliary pins: ≥ 15
If the terrain is complex, additional anchor points may be needed; exceeding the design specifications is not a problem.
5. Basic Equipment for Workers on Slopes
1. Safety harness (fall protection equipment)
2. Flat-head hammer
3. Steel Tying Tools
4. Wire-cutting pliers
5. Cutting edge
6. Pens (red and blue)
Note: Installation methods may vary by company, but this is the basic procedure for installing steel mesh.
Wire Mesh Installation Work (Wire Mesh Installer) Indonesian
Installation of diamond-shaped galvanized wire mesh (welded wire mesh) on a hillside.
The purpose is to improve the bond between the soil and the mortar spray.
When installing steel reinforcement for shotcrete, the wire is tied to the mesh using binding wire.
This netting also helps maintain the integrity of the slope's surface.
The mesh helps bridge the gap between the concrete and the mortar.
Concrete: resistant to pressure
Reinforced concrete: resistant to tensile forces
1. How to Install a Net
There are two ways: from top to bottom or by pulling from bottom to top.
From top to bottom:
Carry the net up the slope, secure one end with an anchor nail, and then lower it slowly.
If the surface is uneven, loosen the net slightly as you lower it.
From bottom to top:
Tie the rope to the end of the net, then pull it from above.
Make sure workers who are pulling use safety harnesses to prevent falls.
People on the ground should be on the lookout for falling rocks while installing the net.
2. Overlapping Nets
This section is very important.
The mesh must be overlapped by at least 100 mm in accordance with construction standards.
If the requirements are not met, the task is considered a failure and must be redone.
3. Installation of Anchor Bolts
Install anchor bolts to secure the net.
There are two types: primary anchor bolts and secondary anchor bolts.
This is the main anchor bolt.
This is an additional anchor bolt.
Examples of installation distances:
– Main panel: 2.0 m spacing (horizontal and vertical)
– Additional mesh: 0.75 m to 1.0 m (at the joints and in the center of the net)
If the ground is hard, use a hammer drill or a rock drill for installation.
Drilling depth:
– Main shaft: ≥ 400 mm
– Additional width: ≥ 200 mm
4. Inspection of the Number of Anchor Bolts
After the netting has been installed, check the number of anchor nails.
Per 100 m²:
– Main pieces: 30
– Additional pieces: 150
On-site, check per 10 m²:
– Main dishes: ≥ 3 items
– Additional pieces: ≥ 15
If the slope conditions are complex, more anchors may be needed; exceeding the design specifications is not a problem.
5. Basic Equipment for Slope Workers
1. Safety harness (fall arrest device)
2. Flat-headed mallet
3. Steel fasteners
4. Steel Wire Cutter
5. Cutting knife
6. Pens (red and blue)
Ras Jaliko Kam in Nepali
A galvanized wire mesh in Dhalaanma A wire mesh (wire mesh) is installed.
This Mesh and Mortar (Cement Plaster) is intended to strengthen .
When making a frame for a window, use The metal rods used to create the frame are tied with wire to form a grid.
In essence, this helps to hold the entire mountain structure and helps to hold the entire mountain structure together .
When using wire mesh, it can help reinforce the weaknesses of concrete and mo can help address the weaknesses of concrete and mortar .
Characteristics of Cankrit: In Chapma, B Leo
Radko's Trait = Tann Baliyo
1. How to Stretch a Mesh
There are two ways to make a ras jali: pouring from the top down and pouring from the bottom from the bottom to the top.
How to Jump Down from Above:
On the top of the ladder leading to the lattice... An anchor pin on one side (The pin used to secure the rope to the mountain) ) is attached to one end, and the other end is .
In the section where the slope is uneven, make the mesh slightly loose and let it drip.
How to go from the bottom to the top:
Tying a rope to the edge of the lattice, it stretches from above.
Personal Safety Belt (a device to prevent falls) must be installed.
People living in the valley should be aware of the risk be aware of the risk of being swept away .
2. Jali Ko Dohoro Rakhai
This is absolutely essential for this work— step in this work.
Place the mesh in layers, with a gap of 100 mm This is not allowed.
To ensure this, in the city, is considered a measurement error, and it must be .
3. Anchor Pin Thokai
Anchor pins are used to secure the mesh is used.
Main Pin and Auxiliary Pin Usage are used.
This is the main anchor pin.
This is a support anchor pin.
Thokne Pitch:
Main Pins: 2.0 m x 2.0 m
Support Pin: 0.75–1.0 m (Lattice overlay section, center)
When the drill bit is stuck, a hammer drill or drill press should be used.
For the main pin: 400 mm deep
Support pin: 200 mm deep
4. Verify the number of anchor pins
After the work is done, a headcount will be conducted .
100 m²:
Main Pin: 30
Support PIN: 150
At the construction site, this measurement is taken in a 10 m² is checked .
10 m² Main anchor pins: There should be 3 main anchor pins and 15.
5. Equipment Required for Workers
1. Seat Belt (To prevent falls)
2. Hammer (for breaking bricks)
3. Hook for securing the flap
4. Wire-cutting pliers
5. Standard Cutter
6. Black and Blue Pen
Depending on the construction company, there may be may vary, but this is a general explanation and explanation.
Wire Mesh Installation Work (Tagalog)
Galvanized diamond-shaped wire mesh (known in Japanese as "rasu-ami") is installed on the slope or side of the mountain.
The purpose of this is to help the mortar (cement mixture) adhere more firmly to the ground.
When placing rebar for a concrete frame, the wire mesh is tied in place using tie wire (alambre).
The mesh is also important for maintaining the mountain's intact and interconnected structure.
The mesh helps strengthen the combination of concrete and mortar.
Concrete Properties = High Compressive Strength
Steel Grade = High Tensile Strength
1. How to Hang the Mesh
There are two ways: from top to bottom, or from bottom to top.
**From top to bottom:**
Place the mesh on the upper part of the slope, secure one end with an anchor pin (a sharp metal pin designed for mountains), and slowly lower it.
If the ground isn't level, spread out the mesh as you lower it.
**From the bottom up:**
Thread the rope through the end of the mesh and pull it up from the top.
Anyone climbing must wear a safety harness (to prevent falls).
People on the ground should watch out for falling rocks.
2. Mesh Overlap
This is a very important part of the job.
According to the standard, the meshes must overlap by at least 100 mm.
If this is not followed, the work will be considered defective and must be redone.
3. Installing the Anchor Pin
The mesh is attached using anchor pins.
There are two types: principal and additional.
This is the main anchor pin.
Here is the additional anchor pin.
**Placement Distance:**
– Main pin: 2.0 m x 2.0 m
– Pandagdag: 0.75–1.0 m (between the center and the edge of the mesh)
If the ground is hard, use a hammer drill or jackhammer.
Lalim:
– Main pin: 400 mm
– Additional length: 200 mm
4. Counting Anchor Pins
After work, the number of anchor pins is checked.
For 100 m²:
– Main pin: 30
– Karagdagang: 150
For every 10 m²:
– 3 main / 15 additional
5. Workers' Equipment on the Slope
1. Safety harness (to prevent falls)
2. Stone chisel
3. Hook for tie wire
4. Cutting Wire
5. Cutter for Other Uses
6. Pula and the Blue Pen
The process may vary depending on the construction company, but this is the general procedure for “mesh installation work” (the process of installing mesh on slopes).