Hello, everyone.
This is Enta.
The Obon holiday ends today, doesn't it?
Did you feel refreshed?
We're already in the latter half of summer!
Let's hang in there until fall!

But that's beside the point.
When you're walking around a construction site, there are always spots where things don't go exactly according to the blueprints, right?
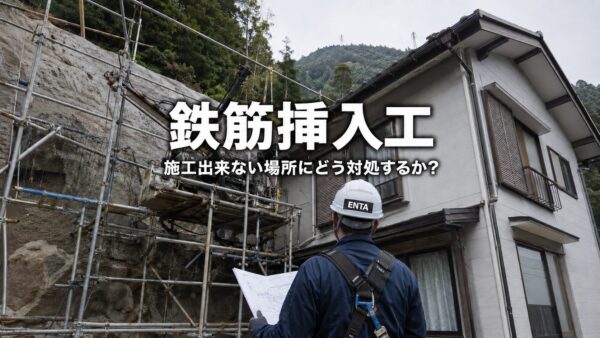
Especially at sites where steep slopes are being addressed, it’s not uncommon to arrive and find that a house’s roof is just a few centimeters from the slope.
In this post, I’ve reorganized and consolidated into a single guide how a site supervisor should respond when “locations where installation cannot be performed according to the design” arise during rebar insertion (rock bolt installation) work.
What kinds of situations are considered locations where concrete cannot be poured?
First, let's visualize the situation in concrete terms.
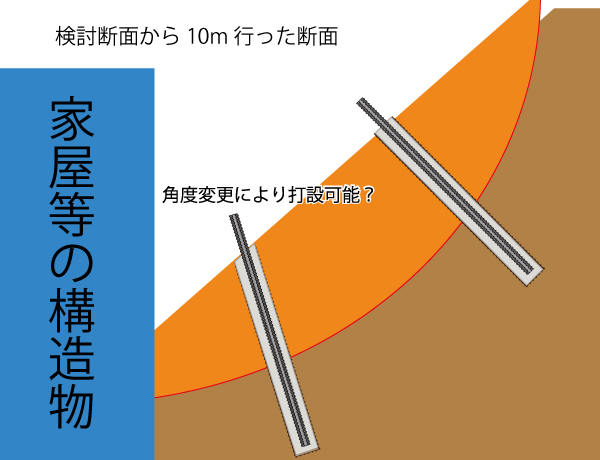
Assume a design that involves driving two piles into the analysis cross-section, using the conventional method (drilling with scaffolding), with a design angle of 30 degrees.
Your role is that of a site supervisor.
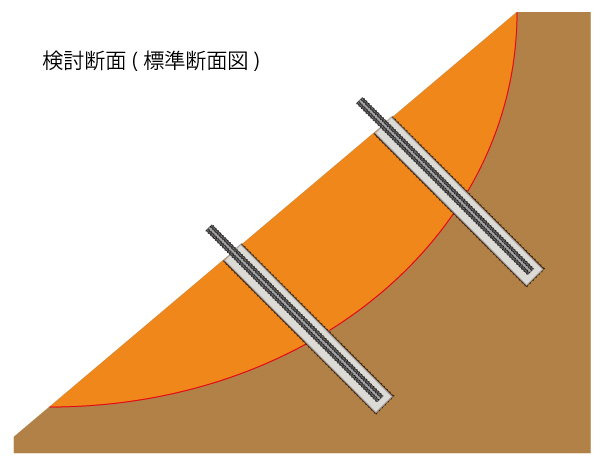
In this section of the standard cross-section, two piles can be driven without any problems by erecting scaffolding and drilling the holes as usual.
However, what if there were structures such as houses behind the cross-section about 10 meters further on?
So-calledWork to Stabilize Steep SlopesSo, I often come across situations like this.
The foreground's fine, but the houses are creeping in from the back, lol.
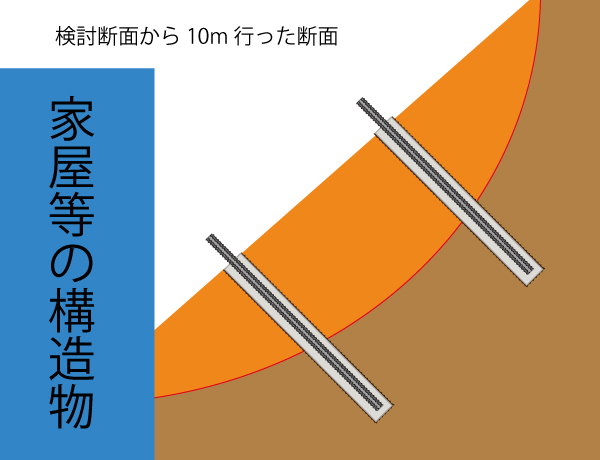
The situation is such that while we can somehow pour the upper section, we simply cannot pour the lower section no matter what we do.
When I say “cannot be poured” here, I mean that even if the angle exceeds the tolerance range used as a guideline on site (I generally use ±2.5 degrees as a guideline on site) relative to the design angle of 30 degrees, it still cannot be poured.
These are merely my own estimates based on my experience in the field; they are not figures established as uniform standards by the Ministry of Land, Infrastructure, Transport and Tourism or academic societies.
Although the soil reinforcement method for natural ground does not require extremely precise placement and angle for each pile, it is still essential to avoid taking unnecessary risks, especially since there are houses behind the site.
Just setting up the scaffolding is a real hassle, and it’s still not too bad if you can secure a scaffolding width of about 2 meters.
The closer the site is to residential buildings, the more important it is to ensure the concrete is poured correctly in those exact spots—which is exactly what makes it such a headache.
Let's walk through, step by step, how to handle this situation as a site supervisor.
The "Assessment of the Current Situation" and "Measures to Address the Current Situation" That a Site Supervisor Performs First
When a veteran player finds a spot they can't hit, I think they usually have the next sequence of moves mapped out in their head.
I think young directors should try asking their seniors for advice sometime lol
What to Do When Assessing the Current Situation
First, let's accurately assess the current situation using numbers.
- How narrow is it? (Measure exactly to ◯◯ meters)
- Is it absolutely impossible for a machine to enter?
- What are the boundaries of the small area (length)?
- How many piles cannot be driven?
- Is it possible to take precautions?
Things to Consider as Measures for the Current Situation
We will explore multiple options for how to carry out the construction under the current conditions.
- Would it be possible to pour the concrete if we changed the construction method?
- Can this be done by hand?
- Can it be switched to the self-drilling method?
- Maybe I'll try changing the angle significantly.
When changing the angle, you need to verify how the stability analysis turns out at that angle.
We will also consider the impact on the construction schedule and cost if we switch to a different type of work.
The Importance of Obtaining a "Written Instruction" During Government Agency Consultations
Once you have gathered the necessary information to assess the current situation and develop countermeasures, you should hold discussions with the relevant government office (generally, this involves submitting written documents such as meeting minutes or discussion records).
To start things off, here’s an update on the current situation.
I will explain the fact that, given the conditions at the site, it is difficult to pour concrete at a 30-degree angle.
Based on that, we will present the construction proposals that are currently feasible, along with their estimated costs (based on cost estimates and other materials), and provide them to the municipal authorities for comparison so they can make a selection.
If you also mention at that time that “the company considers this approach to be the most desirable,” it will help the discussions proceed more smoothly.
Whether construction costs rise or fall, they serve as an important factor in decision-making on-site.
In some cases, cost may take precedence over construction methods or efficiency.
The basic principle is to hold discussions as early as possible to avoid halting work on-site.
And be sure to present two options and discuss their pros and cons at the same time.
A site supervisor needs to be able to anticipate not only the current situation but also what the near future might hold.
That said, since you can make a rough estimate by comparing the blueprints with the actual conditions, it’s not as difficult as you might think.
The Purpose of Receiving Instructions
Ultimately, what matters most is,Obtaining instructions from the government officeThat's it.
For example, if you receive instructions stating, “Do not pour concrete at that location where rebar is to be inserted,” it will be difficult to hold the contractor liable for any subsequent collapse at that location.
This is because it is treated as the responsibility of the client who issued the instructions.
This procedure is also intended to protect both the company and the site supervisor.
On rare occasions, you may encounter a representative who refuses to accept the agreement or meeting minutes; in such cases, it is important to accurately record the date and time of submission.
If you rely solely on verbal communication, it could easily lead to a he-said, she-said argument later on.
Simple, day-to-day practices—such as keeping records in the form of emails or meeting minutes, or saving photos with the date stamped on them—ultimately help protect both the workplace and the company.
In any case, sending an email and leaving a trace are crucial, so this is a very important step.

The Two Options I Actually Have
From here on, I'll talk about how I would actually handle the situation.
This isn't necessarily the best approach—there are many possible methods—but in practice, it usually comes down to these two options.
Option 1: Change the angle while using the same machine
The first thing to check is the range of angles that can be poured using the same machine.
Check whether concrete can be poured within the on-site tolerance of ±2.5 degrees; if that is not possible, determine the maximum angle at which pouring can be performed.
For example, if we assume that the shot can be made with a swing of up to +10 degrees, the actual angle of impact would be 40 degrees relative to the design angle of 30 degrees.
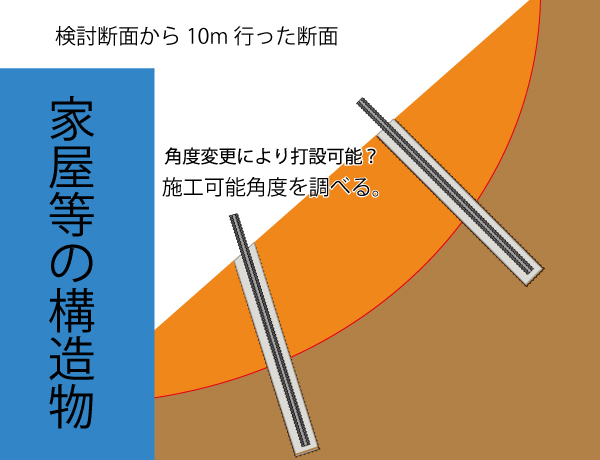
Based on this angle, we will perform the stability analysis again.
We will borrow the original design calculations from the government office, verify the safety factor for the original design cross-section, and then re-examine the design using an angle that is actually feasible for construction.
According to the “Guidelines for Earthwork—Cut and Slope Stabilization,” the planned safety factor for slope stabilization analyses using reinforcement materials is set at 1.2 for permanent structures and 1.05 for temporary structures.
Based on this standard, if the safety factor falls below 1.2, take measures—such as increasing the embedment depth of the rebar—to raise it to 1.2.
If the angle is changed, we’ll also verify how the construction schedule and cost will change in conjunction with other trades.
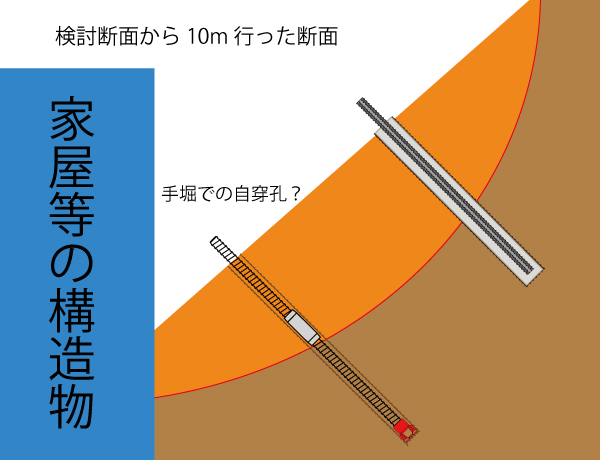
Option 2: Switch to self-drilling rock bolts
If the machinery cannot physically fit, consider switching to self-tapping bolts.
Even though it’s called “self-drilling,” since machinery can’t be used in this situation, the work will be done by hand.
However, since digging by hand is quite physically demanding, narrowing down the area as much as possible will improve work efficiency.
A practical approach is to adjust the angle to accommodate the areas where machinery can reach, and to dig by hand only in the areas where machinery simply cannot reach.
As for the drilling depth when digging by hand, based on my experience in the field, I’d say around 3 meters is the practical limit, but,
This varies depending on the soil conditions at each site and also depends on the skill of the craftsmen.
Furthermore, according to the cost estimation standards of the National Association for the Protection of Specified Slopes, 2.5 meters is the maximum length.
Since there are factors to consider regarding feasibility, the final decision will be made on-site as the official cost estimation standard.
Even in actual construction, digging a hole about 2 meters deep is quite physically demanding work (though, of course, experienced craftsmen can dig much deeper, lol).
With regard to self-drilling rock bolts, there has recently been an increase in cases where they are treated as permanent structures if they meet certain plating specifications.
According to the “Manual for Design and Construction of Earth-Retaining Structures Using Reinforced Soil,” based on past survey data, a corrosion allowance of 0.5 mm around the entire circumference should be factored in for core materials used as permanent structures in road construction.
Even when self-tapping bolts are treated as permanent fasteners, it is essential to verify their corrosion resistance and durability based on this approach.
However, this is strictly intended as an “alternative when standard construction methods (Site Conditions I, II, and III) are difficult to implement”; if standard construction methods are feasible, they take precedence.
When the borehole wall cannot stand on its own and a double-pipe system is not feasible, this is often treated as a candidate for modification; however, since some local governments prohibit the self-drilling method itself,
Advance confirmation is required.
For projects commissioned by the Ministry of Land, Infrastructure, Transport and Tourism (MLIT) and NEXCO, we have a proven track record at our site of implementing design changes and carrying out construction using the self-drilling method.
Since this is an area where opinions may vary depending on the client or region, it’s safer to get into the habit of checking each time rather than assuming, “It was okay at the previous site, so it’ll be fine this time too.”
Making decisions on the spot isn't scary if you keep the "flow" in mind
While the specific measures taken when an area becomes unpileable vary from site to site, the overall process—assessing the current situation, implementing temporary measures, consulting with government agencies, and issuing instructions—remains virtually the same at every site.
This is standard practice for general contractors, but I think it’s worth knowing even if you’re a subcontractor.
To be honest, there’s no need to panic—if you just take it step by step, you’ll be able to handle it.
The most important thing for a site supervisor is to think through every aspect of how to carry out the construction work until the very end.
I can't do it. So how can I do it?
Civil engineering is a constant series of creative challenges—it’s so much fun, isn’t it!
See you later.